Need to have a meeting? Find out if the person is present by checking their connectivity!
Benevolent Gaze provides an easy and interesting way to see who is available in the office. If they are connected to your network they are going to be seen by the Benevolent Gaze. It is as simple as that.
First, let's see if this version of Benevolent Gaze will work with your current network setup. Run the following command from your terminal:
$ ifconfig -a |awk '/broadcast/ { print $2 }' | xargs host
If it returns something like:
21.1.168.192.in-addr.arpa domain name pointer Aarons-MBP.home.
You can use Benevolent Gaze! If it doesn't return a host name, you will have to wait for a future version of Benevolent Gaze.
Now let's get down to business!
$ gem install benevolent_gaze
You will need to install parallel and Redis. If you use Homebrew, it is as easy as:
$ brew install parallel
$ brew install redis
You will also need to install Foreman.
$ gem install foreman
Then in the directory where you want your Benevolent Gaze related things to live (public folder, images etc.) Run the following command:
$ benevolent_gaze install wifi_username wifi_password
This requires two arguments, your wifi username and password so that guests know how to get on your network and be looked on by the Benevolent Gaze.
This command creates a folder caled bg_public which contains a Procfile to use with Foreman so that you can start the kiosk and the tracker. The kiosk is the web UI that lives at localhost:4567. The tracker is the script that scans your network and reports on who has joined.
If you ran the `benevolent_gaze install` command above, you should now have a Procfile and .env file in your folder. The Procfile is good to go. The .env file will need populated with relevant information however. Leave the PORT set to 4567.
AWS_ACCESS_KEY_ID='_insert_your_aws_access_key_here_'
AWS_CDN_BUCKET='_insert_your_aws_bucket_here_'
AWS_SECRET_ACCESS_KEY='_insert_your_aws_secret_access_key_here_'
BG_COMPANY_URL='http://www.yourcompanywebsite.com/where_you_mounted_the_benevolent_gaze_app'
PORT=4567
***You can use your local file system to save image uploads instead of AWS by just not filling in your AWS creds. It defaults to saving to your local file system if you haven't supplied any credentials.
If you want users to associate an image and a name other than their device name with their devices you should add the following to your web app that you want to add the registration url to. Add the following to your routes.rb file.
require 'benevolent_gaze/bgapp'

mount BenevolentGaze::BGApp, at: '/register'
This works by receiving information from the tracker you have running on your local network. So when users hit yoursite.com/register they are redirected to where you have the local kiosk running. Users can now upload a photo, and if they give their same name to all of their devices, they will all be grouped under one avatar.
Animated gifs are supported as well.
Make sure you have Redis running both locally and on the app where you mounted the application. You will need to set your redistogo url in an environment variable called REDISTOGO_URL on heroku (or wherever you have deployed the app where you mounted the registration endpoint).
$ heroku config:set REDISTOGO_URL=''
Start your local benevolent_gaze instance. Go into your bg_public folder and run:
$ foreman start
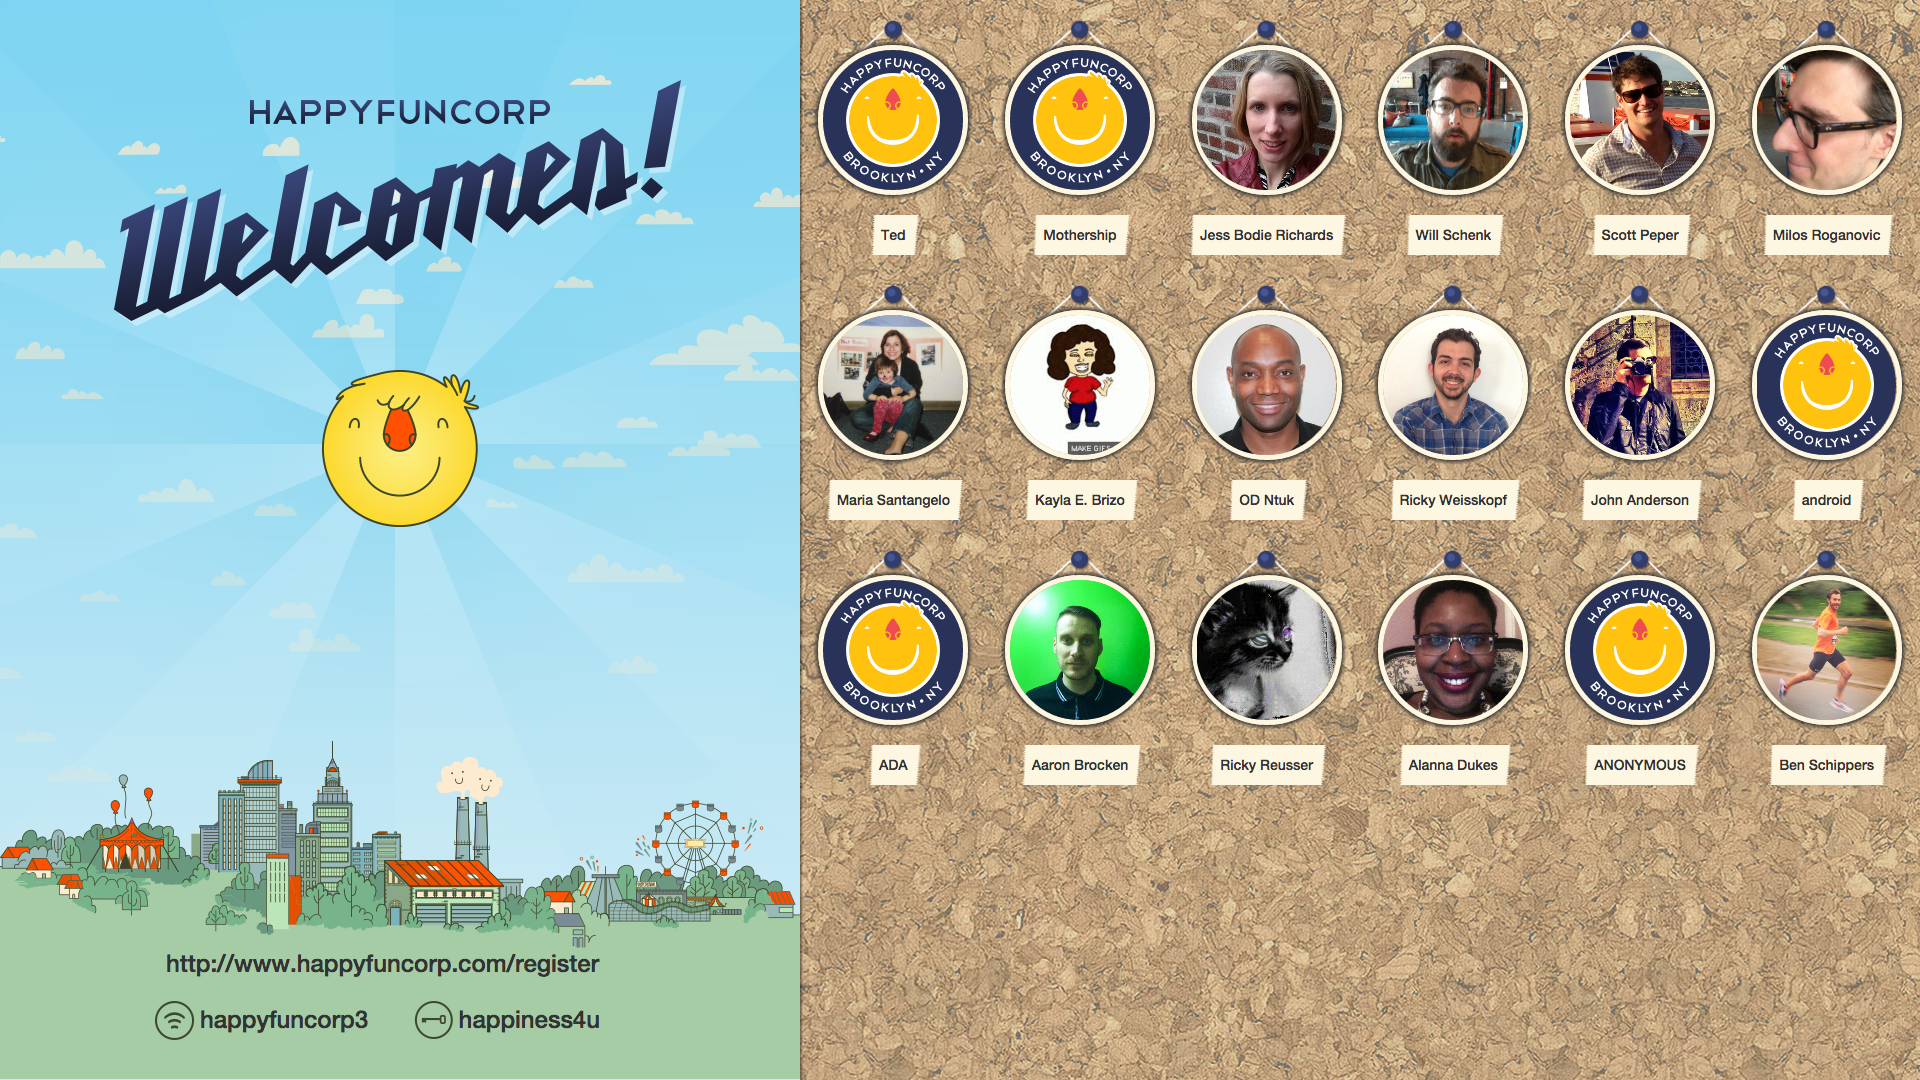
Go to localhost:4567 and check out the interface. You should be able to see people on the right hand side of the screen like the screenshot above!
Enjoy Benevolent Gaze with your friends and fellow colleagues!
$ benevolent_gaze add_user device name image
Running the above command using the device name of the users device, their real name and a url to their image will add them to redis and will help them be identified when they join the network. You would use this if you already had this information. Remember, they can register themselves as well, if you provide the registration URL mentioned above, or use http://www.happyfuncorp.com/register.
$ benevolent_gaze assign_users
This will prompt you for the current users on the network, if any of them do not have a real name or image, it will ask you to provide one.
$ benevolent_gaze bulk_assign yourcsv.csv
This expects a csv formatted with the columns device-name, real-name, and image-url.